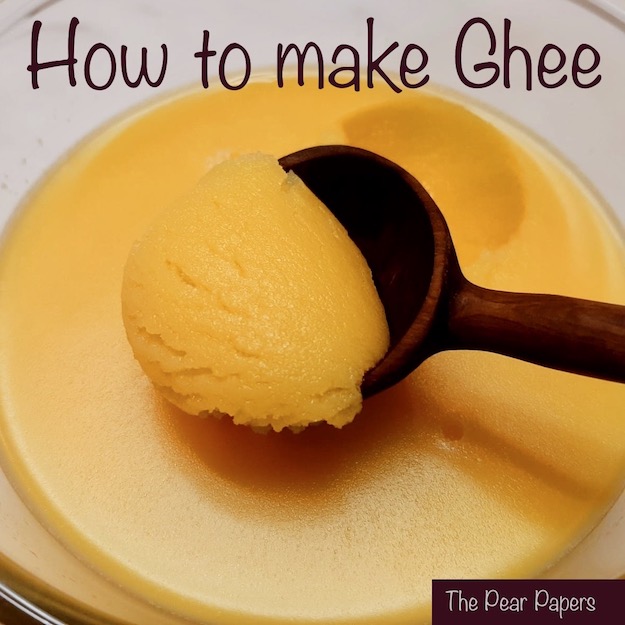
How to make Ghee
Ghee, a form of clarified butter, is the one thing almost all Indian households relish in every meal. This sweet nutty flavored ghee is high in nutrition, contains vitamin A, D, E and K. It helps the body absorb fat soluble vitamins from food. You can add it in any stage of cooking and it tastes great when used for deep frying, shallow frying, tempering, drizzling on top of food, etc. The smoke point of ghee is very high (250°C) so it’s a good choice for deep frying.
Ghee has a significant place in Ayurveda. There is a traditional practice in many Indian households when babies are introduced to solid food. Babies are fed cooked rice with ghee as the first meal. It is a very versatile ingredient and can be used in sweet as well as savory dishes. Add a dash of ghee to enhance the flavor of any dish and increase its nutritive value.
Making ghee at home is extremely simple and cost effective. The aroma of fresh homemade ghee is unmatched. Perfectly slow cooked ghee has a grainy, sand like texture at room temperature.
Ingredients
Unsalted Butter – 400 g
Yield
~320 g
Prep time
–
Cook time
25 mins
Method
1) Melt butter in a deep pan on low heat.
2) Stir the melted butter once every 2 or 3 mins. Allow it to boil on low heat constantly.
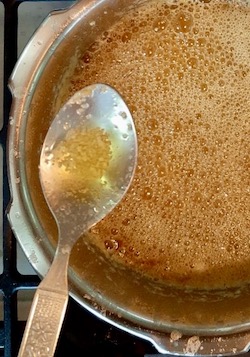
3) Once the butter melts completely, it will start to froth and splutter mildly. Don’t worry about the spluttering. This is because of the negligible amount of salt present in most store bought butter (even though the packaging says unsalted). This doesn’t happen when we make ghee from home made butter.
https://thepearpapers.com/wp-content/uploads/2020/10/e98d3855-5e6d-4c74-bc7b-b2e84b5e4b9c.mov
4) After a few minutes of spluttering the froth clears and small bubbles appear on the surface. At this stage small grainy milk solids start to deposit at the bottom of the pan. Allow it to boil further, stirring every now and then.
5) Keep checking the colour of the grainy solids that deposit at the bottom of the pan. When you see the particles becoming mild brown in colour, switch off the heat.
6) Let the pan sit on the stove for 3 to 4 mins more after the heat is switched off. Wait until the bubbling stops completely. By now the particles deposited at the bottom will change into a golden brown colour.

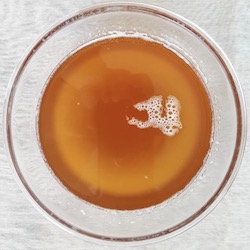
7) Now remove the pan from the stove and filter the ghee through a strainer to remove the brown particles (milk solids). Store in a clean dry glass/stainless steel container at room temperature. Allow it to cool completely. (See Note 4)
Notes
- Use a fairly deep pan to make ghee. If a shallow pan is used, when the melted butter starts to splutter mildly (this does not happen always), there is a chance that the stove top might become dirty and also it might splatter on the hand while trying to stir.
- Stirring the butter in-between is necessary, otherwise the milk solids that settle at the bottom of the pan might char and alter the smell of the ghee.
- Adding a few curry leaves or moringa leaves just before switching off the heat gives a unique flavor. This flavored ghee can be used in many savory dishes like rotis, parathas, mixed rice, plain rice, upma, kichadi, venn pongal and many more.
- After cooking, strain your ghee into the container in which you will store it. Allow it to set at room temperature for 24 to 36 hrs. The set ghee should have a grainy texture, which you won’t see if you refrigerate before it sets. This texture is not really important for the taste or shelf-life but it is the only indicator that you have made your ghee correctly. Undercooked ghee will never get this grainy texture and overcooked ghee will have dark grains and give off a burnt smell. Once you see that your ghee has set correctly, you can go ahead and refrigerate if you wish. You will lose the grains but that’s okay.
- Stored at room temperature, ghee stays fresh for 3-5 months. If refrigerated, it stays fresh for nearly a year.
- The golden coloured milk solids strained out at the end are also edible. Mix a couple of tbsps of almond flour, some freshly grated coconut, some sugar and a pinch of cardamom to this milk solids and enjoy it as a yummy snack!


You May Also Like