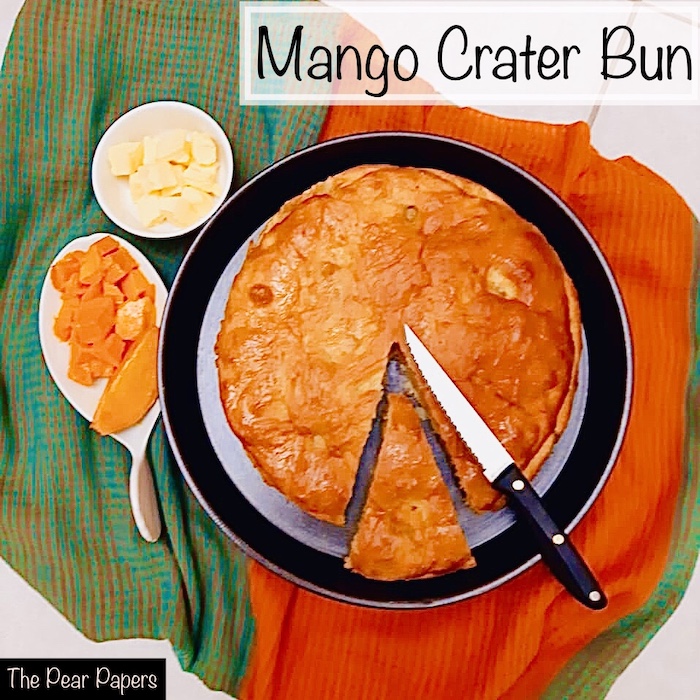
Mango Crater Bun
Mango Crater Bun is a stuffed bun, heavily inspired by the bakery style Coconut bun or otherwise called ‘dil pasand’ in my favourite local bakery. With the twist of ripe, sweet mangoes and crunchy, nutty filling and the surface of the bun resembling small craters, this mango filled dish will get you loads of praises for sure.
This bun is quite simple and straightforward to make, but a little time consuming (mainly the time taken to proof the dough – like in any bread or bun). But it’s totally worth it. Using your fingers to spread the dough instead of using a rolling pin gives the unique crater effect to the surface of the mango bun.
This recipe is quite versatile, in the sense, instead of mango you can use any firm pulpy sweet fruit like strawberry, blueberry, apple, banana, pear, nectarine or peach or a combination of more than one fruit. Just play around with the flavouring essence accordingly to suit the fruit you are using. Similarly the nutty filling can be made with any nut of your choice. See the notes below for making this recipe vegan. So go ahead, make this yummy mango crater bun and enjoy the ‘king of fruits’ with your loved ones!
Ingredients
BUN:
Warm milk (any vegan milk will also do) – 1/4 cup
Sugar – 2 tbsp
Dry yeast – 1/2 tbsp
All purpose flour – 2 cups
Mango pulp – 1/4 cup
Salt – a pinch
Butter/Any neutral oil – 3 tbsp
Water – as required
Mango essence – 1 tsp
MANGO FILLING:
Butter/oil – 2 tsp
Mango jam – 1/4 cup
Roughly crushed mango pieces – 1/2 cup
Powdered nuts (cashews/almonds/walnuts/macadamia/pecans) – 1/4 cup
Mango essence – 1 tsp
Slivered Pistachio – 1/4 cup
Yield
Serves 6
Prep time
2.5 hrs
Cook time
40 mins
Method
1) In a large bowl take warm milk. Add the sugar. Mix. Then add the dry yeast and mix again. Cover and set aside for 5 mins.
2) After 5 mins the yeast-milk mixture will be frothy meaning the yeast is activated. Now add the mango pulp, salt, mango essence and 2 tbsp butter or oil. Mix.
3) Now add the flour and start mixing gently. Add water little by little to bring the flour together and form a dough. Once the dough has come together, transfer it to a counter top dusted with flour.
4) Start kneading the dough with your palm. The dough will be slightly sticky initially, but don’t add more flour. Continue stretching and kneading the dough to activate the gluten. After 5 to 7 mins of kneading the dough will become very soft, smooth and non sticky.
5) Lift the dough from your counter top, mildly stretch from the sides and tuck it at the back and form a smooth ball. Keep it in a greased bowl and apply a drop of oil on the surface. Cover the bowl with a cling wrap, damp cloth or a firm lid. Place this bowl with the dough in a warm, dry place. Let it rest for 2 hours for the first proofing.
6) In another bowl take all the ingredients for the mango filling except the butter/oil and mix well. After mixing, refrigerate this mixture until needed.
7) After 2 hours the dough ball should have doubled in size. Grease your hands with oil and gently punch it to remove the excess air. Now transfer the dough on to your counter top again. Roll it into a cylinder shape and divide the dough into two portions. Take the mango filling out of the refrigerator.
8) Grease and line a round 30 cm baking tray with parchment/baking paper. Now take the first portion of the dough and place it on the baking paper. Slowly start expanding the dough with your greased fingers until it reaches the edge of the baking tray.
9) Spread some butter/oil on top of the dough and then spread the mango filling on top of that. Spread evenly, leaving some space at the edge, kind of like how you’d put sauce on a pizza base. Now just wet your hands and run a finger along the uncovered edge to make it slightly wet.
10) Take the second portion of the dough and place it on the counter top. Spread it with your fingers almost to the same size as the previous one. Now gently lift this sheet of dough and cover the mango filling to form the top half of the mango bun. Gently press the edge throughout, to seal the filling inside the mango bun completely. Cover with a damp cloth and leave it to proof a second time for another 30 mins.
11) Preheat the oven to 180˚. After 30 mins the dough will double in size again. Now brush the top surface of the bun gently with milk (mix almond/soy/oat milk with maple syrup/agave – 2 portions milk and 1 portion maple syrup/agave for the vegan version). Make a gentle slit in the centre with a knife. This helps the bun expand while baking. Place the mango bun in the middle rack of your oven and bake at 180˚ for 30 mins.
12) After 30 mins remove the Mango Crater Bun from oven. Dab the surface with a tsp of butter/oil and allow it cool for 10 mins. Now remove it from the baking tray carefully and place it on a wire rack to cool completely. After it cools, slice it up and serve.
Notes
- You can use any vegan milk in this recipe. Even coconut milk, with its strong taste, will go well with the mango flavour.
- The mango filling should be reasonably spreadable and not runny. If it’s too wet, increase the amount of powdered nuts accordingly. On the other hand, if you feel that the stuffing is slightly dry, then add a couple of teaspoons of mango puree or jam (don’t add water) to the filling to bring it to spreadable consistency.
- The crater effect mainly comes from spreading the dough with your fingers. If you want a smooth finish for your bun, then use a rolling pin to roll out the dough instead of using your fingers.
Beginners’ tips
- Always use a fresh stock of yeast while baking any kind of bread/bun. Old or stale yeast may not activate properly and will make your bread flat, dense and hard.
- Use lukewarm milk to activate the yeast. Cold milk will not activate the yeast and hot milk will kill the yeast.
- Correct measurements and proper proofing are very important for baking bread. So follow both without compromising even a bit. Choose a warm, dry place in your house to proof the dough.


2 Comments
MotherOfNOMS
Hi Samantha,
Yes, this will be a wonderful dessert for your family brunch time! Go ahead, try this recipe and let me know how you liked it 🙂
Samantha Laycock
This sounds like it would make an incredible brunch dish.